![]()
Beautiful Plants For Your Interior
![]()
Beautiful Plants For Your Interior

I'm excited to share ten creative Easter cookie decor ideas that can truly enhance your celebration. You might try making pastel ombre cookies for a soft gradient effect, or opt for whimsical chick cookies decorated with vibrant royal icing. Bunny face cookie pops offer a fun twist, while floral blossom decor adds an elegant touch. Transform cookies into stained glass windows using crushed candies, and consider tie-dye icing techniques for a marbled appearance. Edible glitter accents can elevate your designs, and cookie decorating kits are perfect for a collaborative activity. There's plenty more to explore for your festive baking adventure.
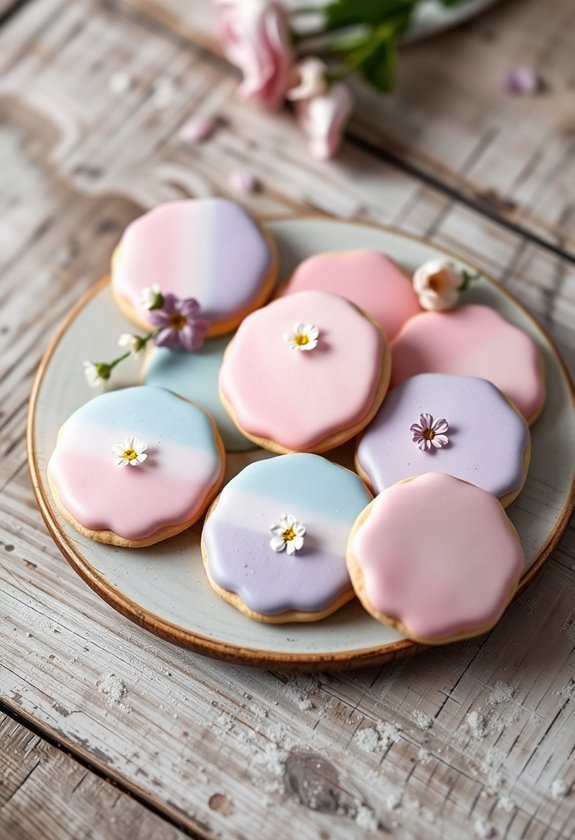
For a delightful twist on traditional Easter treats, I love making pastel ombre cookies. These cookies not only taste amazing but also look stunning, making them perfect for spring celebrations.
To start, I prepare a basic sugar cookie dough, ensuring it's well-chilled for easier handling. Dividing the dough into three equal portions, I add food coloring to create a gradient effect. To enhance their appearance, I often use Easter egg decor ideas like sprinkles and edible decorations.
I typically use shades like light pink, lavender, and mint green. After mixing, I roll each color into logs, stacking them together and gently pressing to combine. Then, I slice the logs into rounds, ensuring that each cookie showcases the beautiful ombre design.
Once baked, I let them cool completely before decorating. For a polished finish, I use a simple glaze made from powdered sugar and milk, adding just enough liquid to reach a drizzle consistency.
I might sprinkle edible glitter or nonpareils for a bit of sparkle. These cookies are a fun way to incorporate Easter cookie decor ideas into your celebration, enhancing the festive atmosphere.
These pastel ombre cookies not only delight the eyes but also invite creativity in their decoration, making them a perfect addition to any Easter gathering. They'll surely impress your friends and family, while also adding a festive touch to your dessert table.
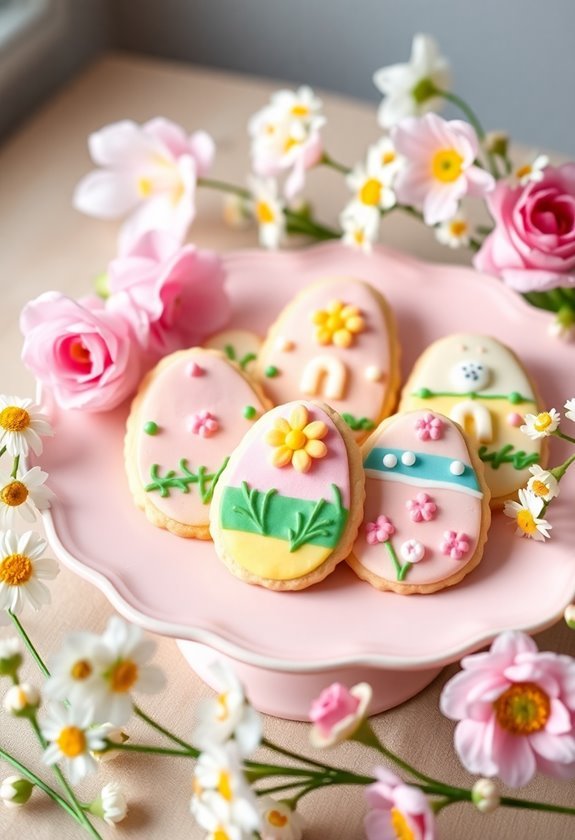
Easter egg sugar cookies are a fun and festive treat that I love to make during the holiday season. These cookies not only taste great, but they also provide an excellent canvas for creative decoration.
I usually start with a basic sugar cookie recipe, rolling out the dough and cutting it into egg shapes using a cookie cutter.
Once baked and cooled, I prepare royal icing, which is ideal for decorating, as it dries hard and allows for intricate designs. I often color the icing with pastel shades—think soft pinks, blues, and yellows—to capture that Easter spirit.
To decorate, I use a piping bag for outlining the egg shapes and flooding techniques to fill in the spaces. I also like to sprinkle edible glitter or tiny sugar pearls for an extra sparkle.
For added creativity, I sometimes use food-safe markers to draw patterns once the icing sets. Simple designs, like polka dots or stripes, can make these cookies visually appealing without requiring advanced skills.
These Easter egg sugar cookies are sure to delight family and friends, bringing a touch of sweetness to your celebration. Additionally, incorporating Easter decor ideas can enhance the overall festive atmosphere of your gathering.
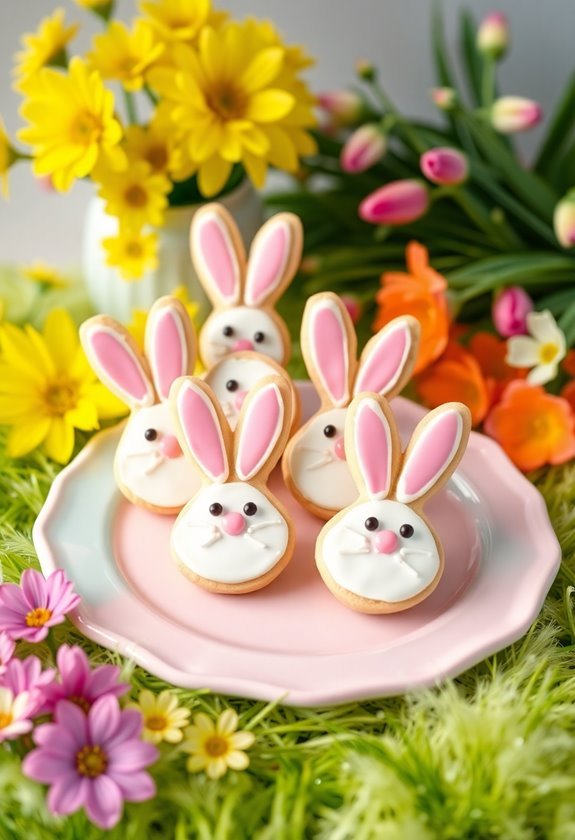
Creating Bunny Face Cookie Pops is a delightful way to combine baking and crafting into one fun project. To begin, you'll need a batch of your favorite sugar cookie dough. Roll it out and cut it into circles for the cookie pops. After baking, let them cool completely. Additionally, you can enhance your decorating skills by exploring easy cupcake thanksgiving decor ideas for more festive inspiration.
Next, prepare your decorations. Use white and pink icing to create the bunny's face. For the eyes, I prefer using small chocolate candies, while the nose can be made from a pink candy or icing. Once the base icing is dry, use a black edible marker or a fine tip of black icing to draw the whiskers and mouth.
Now, for the cookie pops, insert a lollipop stick into each cookie before icing. This step guarantees the stick adheres well. If you want a bit of flair, consider rolling the edges in colorful sprinkles or using edible glitter for that extra sparkle. You can also add some festive touch to your presentation by incorporating Easter basket decor ideas that complement the Bunny Face Cookie Pops.
Finally, allow everything to set before displaying your Bunny Face Cookie Pops. They make great treats for a gathering or as a fun activity with kids. Enjoy the smiles they'll bring—both in creating and sharing!

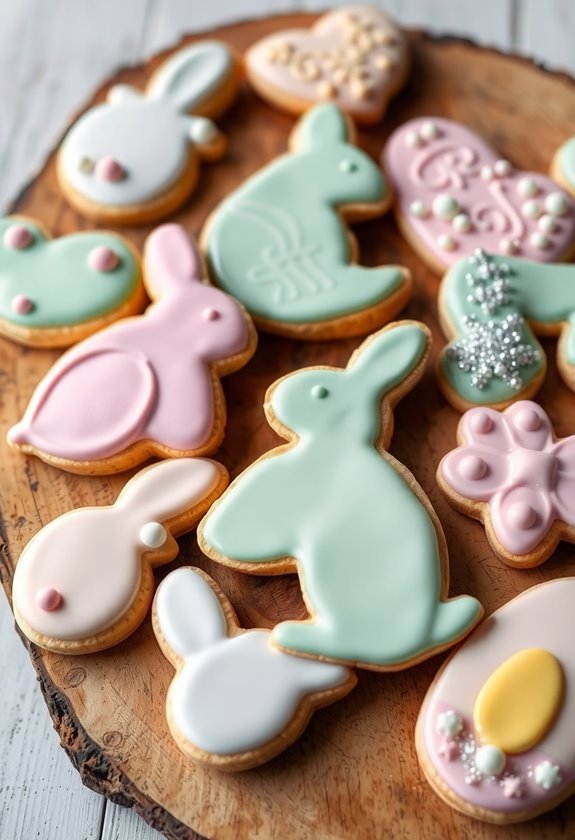
Brightly colored blossoms can transform ordinary cookies into stunning edible works of art. To create floral blossom cookies, I start with a basic sugar cookie recipe, rolling out the dough to a uniform thickness. After cutting out the shapes, I bake them until they're just golden.
Once cooled, it's time to decorate. I use royal icing for its smooth finish and quick drying time. First, I outline the flower shapes with a piping bag, letting the icing dry before flooding the centers with a different color. For a lovely touch, I add details like petal lines or dots using a contrasting color.
To really bring the blossoms to life, I often incorporate edible glitter or shimmer dust. Just a light sprinkle can make your cookies sparkle under the light. If I want a more natural look, I opt for colored sugar or finely crushed freeze-dried fruit, which adds both color and flavor. Additionally, using Easter decor inspiration can help elevate your cookie designs with seasonal themes and motifs.
Lastly, consider adding leaves or stems with green icing to complement the flowers. This not only enhances the floral theme but also adds depth to your design. Additionally, using seasonal elements like autumn decor ideas can inspire unique themes for cookie decorating throughout the year.
With these simple techniques, your Easter cookies will surely stand out at any celebration.
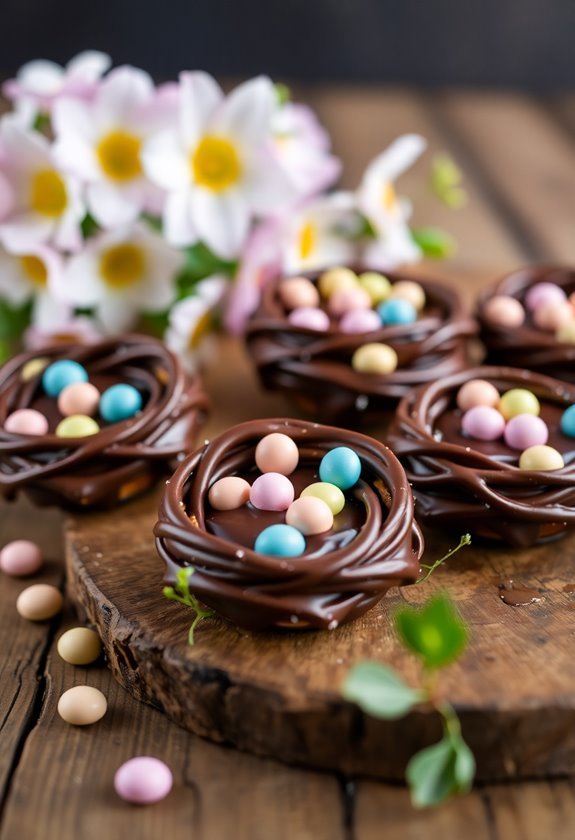
Nestled among the sweet treats of spring, chocolate-dipped pretzel nests offer a delightful combination of salty and sweet flavors.
These treats aren't only easy to make, but they also bring a whimsical touch to your Easter celebration. To create your own, you'll need pretzel rods, chocolate melts, and colorful candy eggs. Consider using these treats as part of your overall backyard fence decor ideas to enhance your festive atmosphere.
Start by melting the chocolate according to the package instructions. Dip one end of each pretzel rod into the melted chocolate, ensuring it's well-coated.
Next, gently press the chocolate-covered end into a small mound of crushed pretzels or sprinkles to resemble a nest. Allow the chocolate to set on parchment paper.
Once the nests are firm, it's time to fill them. Place a few candy eggs—like chocolate eggs or jelly beans—into each pretzel nest. This step adds a pop of color and a festive touch.
You can even experiment with different types of chocolates, such as white or dark, to create a variety of nests. These delightful treats are perfect for sharing or as a fun centerpiece. Additionally, pairing your treats with Easter door decor can enhance the overall festive atmosphere of your celebration.
Just remember, they may disappear faster than you think, so make sure to whip up a generous batch!
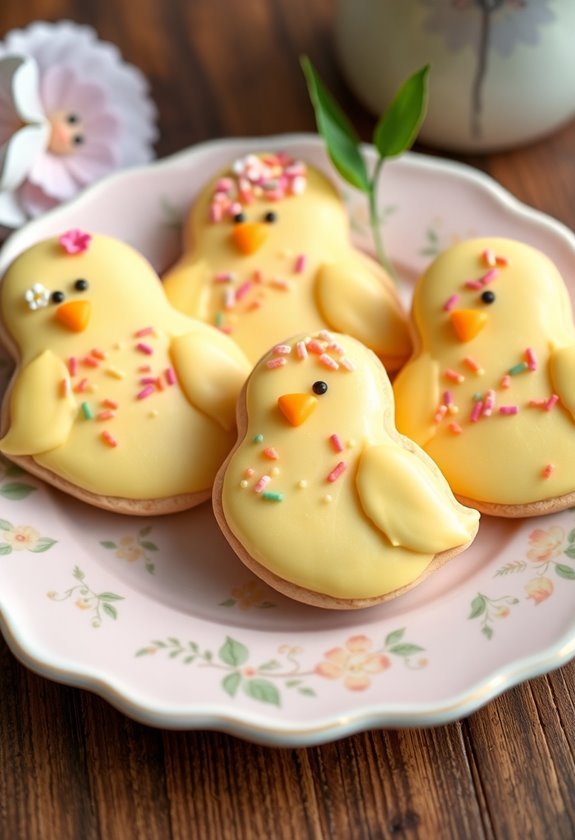
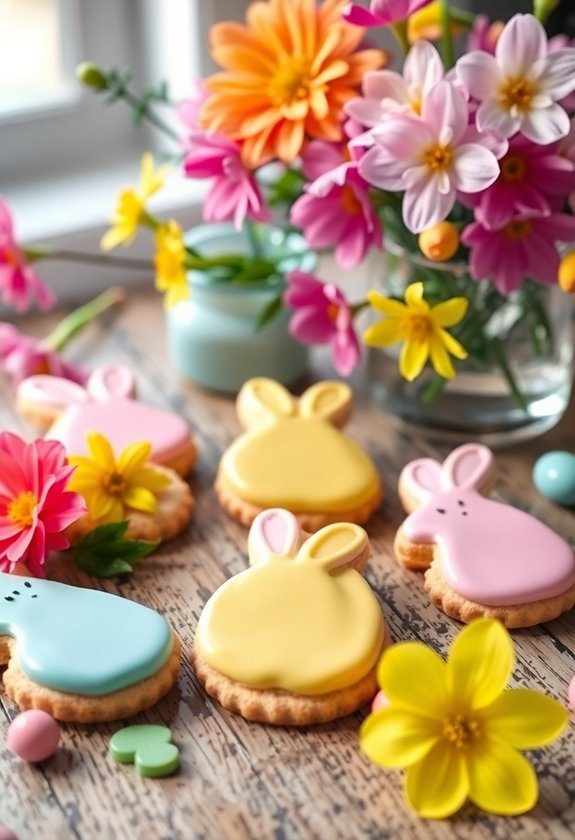
As Easter approaches, I love to bake whimsical chick cookies that add a playful flair to our celebrations. These cookies aren't only adorable but also simple to make, allowing you to express your creativity. Incorporating creative cookie designs can elevate your dessert table, making them a delightful addition to your event.
Start with a basic sugar cookie recipe; roll out the dough and use a chick-shaped cookie cutter to create your base.
Once baked and cooled, it's time to decorate. I use pastel-colored royal icing to bring these little chicks to life. Begin by outlining the shape with a piping bag, then flood the interior with a thicker icing to create a smooth surface. Let this dry before adding details.
For the eyes, I use small black candy pearls or chocolate chips, placing them on the wet icing for easy adhesion. Yellow edible glitter can add a fun sparkle, representing feathers, and a small orange triangle of fondant or candy can serve as the beak.
These whimsical chick cookies are perfect for any Easter gathering. They're sure to impress your guests while providing a delightful treat. Plus, they make for great conversation starters as everyone admires your handiwork! Incorporating these cookies into your festivities can enhance the overall Easter decor inspiration for your celebration.

Transforming ordinary cookies into stunning stained glass window cookies is one of my favorite Easter baking projects. These cookies not only look gorgeous, but they also taste delicious, making them a delightful addition to any celebration. To elevate your cookie display, consider incorporating themed decorations that complement the festive spirit.
To create these eye-catching treats, I start by baking a batch of sugar cookies in fun shapes, like eggs or flowers. While the cookies cool, I prepare the "glass" part, which is made from crushed hard candies. I typically use Jolly Ranchers because they come in vibrant colors. After unwrapping them, I place the candies in a resealable bag and crush them into small pieces.
Once the cookies have cooled, I use a small round cutter to remove the center of each cookie, creating a frame. Next, I fill the cut-out sections with the crushed candy, making sure to pack it tightly. I then bake the cookies again until the candy melts and fills the void, creating a beautiful stained glass effect.
After cooling, I can decorate the cookie edges with royal icing for a polished look. These stained glass window cookies are sure to impress and inspire creativity during your Easter festivities! Additionally, these cookies are a perfect opportunity to use Easter cake decor to enhance your holiday table setting.
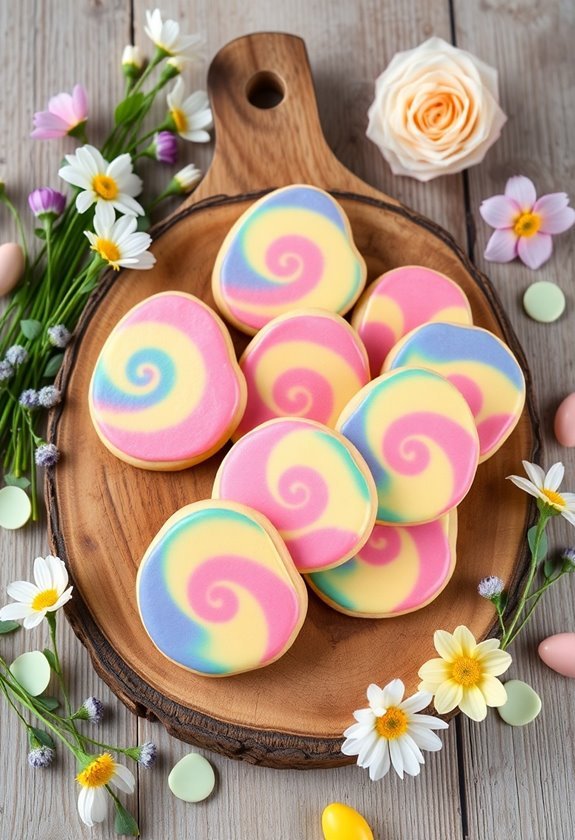
Creating vibrant tie-dye icing is a fun way to add a burst of color to your Easter cookies. This technique involves mixing different colors of icing to create a marbled effect that's visually stunning.
To start, prepare your royal icing and divide it into separate bowls. Add gel food coloring to each bowl, mixing until you achieve the desired shades.
Next, take a piping bag and fill it with one color of icing, then add a second color alongside it, making sure not to mix them too much. This is where the magic happens! You can use multiple colors in one bag, layering them for even more complexity.
To apply the icing, gently squeeze the piping bag onto your cookie, allowing the colors to swirl together as you move the bag. Don't worry about perfection; the beauty of tie-dye is its unpredictability.
Once you've covered the cookie, use a toothpick or a skewer to gently swirl the colors together for a more blended effect. Additionally, incorporating Easter decor ideas into your presentation can enhance the festive atmosphere of your celebration.
Let your cookies dry completely before displaying them. These tie-dye creations will surely be a hit at your Easter celebration!
Adding edible glitter accents to your Easter cookies can instantly elevate their visual appeal. This simple addition transforms ordinary cookies into dazzling treats that catch the eye.
To start, choose a high-quality edible glitter that's safe for consumption. You'll find various colors and textures, so pick ones that complement your cookie designs.
Before applying the glitter, verify your cookies are frosted and ready for decoration. While the icing is still wet, sprinkle the glitter generously over the surface. This will help the glitter adhere better and create a more vibrant look.
If you want a subtle effect, consider using a fine glitter, while chunkier types can add a fun, whimsical touch.
Another idea is to use glitter selectively, focusing on specific elements like flowers or bunny shapes. This can create a more artistic presentation and draw attention to your favorite designs.
After decorating, let the cookies dry completely to set the icing and glitter.
When serving, the glitter not only enhances aesthetics but also adds a festive touch that's perfect for Easter celebrations.
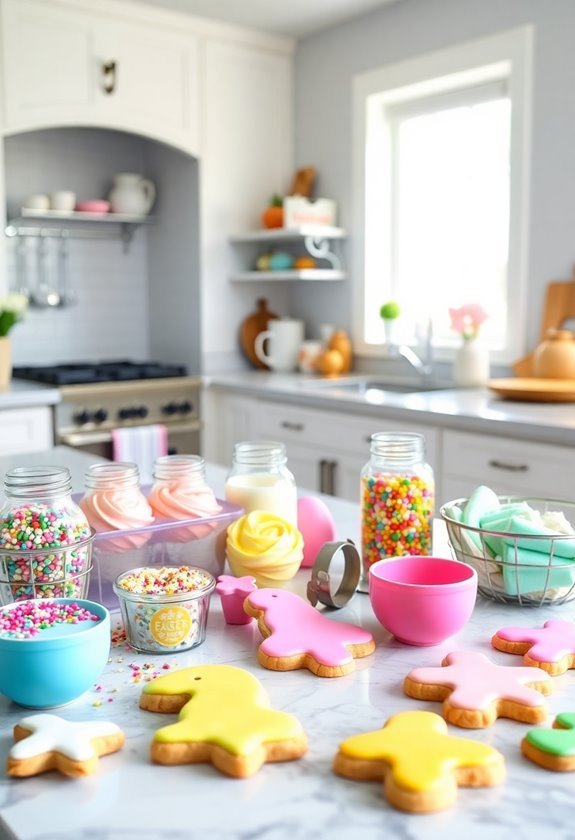
The joy of decorating cookies can be even more accessible with cookie decorating kits. These kits typically include everything you need to create beautiful, themed cookies, making them perfect for Easter celebrations. Most kits come with pre-baked cookies, colorful icing in piping bags, and a variety of sprinkles or edible decorations. You won't have to worry about gathering supplies, which can make the decorating process feel less overwhelming.
When you open a decorating kit, you'll find clear instructions that guide you through the process. I love how these kits often provide tips on techniques, such as flooding and outlining, which are essential for achieving professional-looking results. Flooding involves filling in areas of the cookie with thinned icing, while outlining helps create defined shapes.
Using a kit can also spark creativity; you might find inspiration to mix colors or combine different decorations. Plus, it's a fantastic activity to share with family or friends, encouraging collaboration and laughter.
When I think about the best cookies for decorating, I love using sugar cookies and gingerbread. They hold their shape well, and the soft texture makes it easy to apply icing and decorations.
I store my decorated cookies by placing them in a single layer in an airtight container. If I need multiple layers, I use parchment paper to separate them, ensuring they stay intact and beautiful.
Can you imagine biting into a delicious cookie that's gluten-free? I've used gluten-free flour in cookie recipes before, and it works beautifully. Just remember to check the blend for the best results!
When I decorate cookies, I always use piping bags, various tips, and food coloring. I also grab spatulas, rolling pins, and a good set of cookie cutters. These tools really make the process enjoyable!
They say, "Good things come to those who wait," but decorated cookies typically last about one week if stored properly. I always keep mine in an airtight container to maintain their freshness and flavor.